Configuring Redis for WordPress
Redis is widely used with WordPress as an object cache, storing the results of expensive database queries, transient data, and computed values in memory so they can be retrieved in microseconds rather than hitting MySQL repeatedly. Configuring Redis correctly for this use case means understanding what Redis features you actually need, and disabling the ones you don’t.
If you’ve had issues with Redis actually slowing down your site in the past, the likelihood is this is coming from bad/old/large/excessive options in your database and in that case you should check out my guide to managing your wp_options table.
Table of Contents
- Installing Redis
- Why Redis Disk Persistence Is Not Required for WordPress
- Redis Persistence Mechanisms
- Disabling RDB Snapshots
- Disabling AOF
- Eviction Policies
- Key Settings to Configure in Redis.conf
- Install the Redis Object Cache plugin by Till Krus
- PECL/PhpRedis vs Predis
- Configuring wp-config.php for Redis
- What if you cannot install Redis?
- What to notice with Redis installed
Installing Redis
Chances are, it’s already installed on your host. If you can SSH to your server, you can run:
redis-cliAnd if that brings you to a Redis-looking prompt, you have Redis installed. If not, you can typically install it using:
sudo apt install redis-serverWhy Redis Disk Persistence Is Not Required for WordPress
Redis supports writing its in-memory data to disk so it can survive a restart. For many use cases this is critical, but WordPress is not one of them.
WordPress uses MySQL (or MariaDB) as its authoritative data store. Every piece of content, every option, every user record lives in the database. Redis holds only a derived, ephemeral copy of that data: a cache. If Redis restarts and loses everything in memory, the worst outcome is a cold cache: WordPress falls back to querying the database directly until the cache is warmed up again by normal traffic. This is a temporary performance degradation, not data loss.
Because Redis is not the source of truth for anything, there is no value in paying the I/O cost of writing cache data to disk, and no risk in skipping it. Disabling persistence reduces disk wear, eliminates I/O overhead, and simplifies Redis’s operational footprint.
Redis Persistence Mechanisms
Redis ships with two persistence mechanisms, both of which should be disabled for a WordPress cache.
RDB (Redis Database) Snapshots
RDB persistence works by forking the Redis process at configured intervals and writing a point-in-time snapshot of the entire dataset to a binary .rdb file on disk. By default, Redis is configured to trigger snapshots after a certain number of write operations within a time window. For example, saving after 1 write in 3600 seconds, after 100 writes in 300 seconds, or after 10,000 writes in 60 seconds.
The snapshot process is relatively efficient due to copy-on-write memory semantics, but it still consumes CPU during the fork, causes latency spikes under memory pressure, and produces large snapshot files that serve no purpose for a cache workload.
AOF (Append-Only File)
AOF persistence works by appending every write command Redis receives to a log file on disk. On restart, Redis replays this log to reconstruct the dataset. AOF provides much more granular durability than RDB (down to every individual write if configured with always fsync) but at the cost of significant and continuous disk I/O.
For a WordPress object cache, an append log of every SET command is entirely pointless. The data will be regenerated from MySQL the next time it is needed.
Disabling RDB Snapshots
RDB is configured via save directives in redis.conf. A default installation typically includes three lines similar to:
save 3600 1
save 300 100
save 60 10000
Each line defines a threshold: save <seconds> <changes> triggers a snapshot if at least <changes> write operations have occurred within the last <seconds> seconds.
To disable RDB, comment out all three lines:
# save 3600 1
# save 300 100
# save 60 10000
Alternatively, Redis 3.2+ supports an explicit empty save directive to disable snapshots entirely:
save ""
I tend to comment out the 3 lines and add save “” just to eliminate doubt for any future redis.conf readers.
Either approach prevents RDB snapshots from being written. If an .rdb file already exists on disk, Redis will still load it on next startup but you can delete it safely if you want a clean start. You can check where your .rdb files are stored using:
redis-cli CONFIG GET dir
redis-cli CONFIG GET dbfilename
Typically they will be stored in /var/lib/redis/*.rdb
Disabling AOF
AOF is controlled by a single directive in redis.conf:
appendonly yes
Change this to:
appendonly no
This tells Redis not to maintain the append-only log at all. No AOF file will be created or written to. This is typically the default in a fresh Redis installation, but it is worth verifying explicitly, particularly if Redis was previously configured for a different workload.
Eviction Policies
Redis is an in-memory store, and memory is finite. When Redis reaches its configured memory limit (maxmemory), it must decide what to do with new write requests. This behaviour is controlled by the maxmemory-policy directive.
Without a maxmemory limit set, Redis will consume as much memory as the system will allow, potentially causing the OS to kill the process or swap to disk — both outcomes are worse than a managed eviction. Without an eviction policy, Redis will return errors when memory is exhausted rather than making room for new data.
For a cache, the correct behaviour when memory is full is to evict old or infrequently used data to make room for new data. This is handled automatically once both settings are configured.
LRU vs LFU
Redis offers two broad eviction strategies relevant to WordPress:
LRU — Least Recently Used Evicts the key that has not been accessed for the longest time. A key that was cached an hour ago and never touched since is a better eviction candidate than one that was written 10 minutes ago and read repeatedly. LRU tracks recency of access.
LFU — Least Frequently Used Evicts the key that has been accessed the fewest times overall, using a frequency counter that decays over time. LFU is generally the better choice for WordPress object caches because it retains keys that are accessed repeatedly (e.g. site options, popular product data) even if they haven’t been accessed in the last few seconds, while dropping keys that were fetched once and never requested again.
The relevant policy values for WordPress are:
| Policy | Behaviour |
|---|---|
allkeys-lru | Evict any key using LRU. Good general-purpose cache policy. |
allkeys-lfu | Evict any key using LFU. Better for workloads with hot/cold data patterns. |
volatile-lru | Evict only keys with a TTL set, using LRU. Keys without TTL are never evicted. |
volatile-lfu | Evict only keys with a TTL set, using LFU. Keys without TTL are never evicted. |
For most WordPress installs, allkeys-lfu is the recommended policy. It treats Redis as a pure cache, evicts based on actual usage frequency, and does not require every key to have a TTL set to be eligible for eviction.
Setting maxmemory
maxmemory defines the hard ceiling for Redis memory usage. A reasonable starting point is to allocate enough memory to hold your working set comfortably — typically between 256MB and 1GB for most WordPress/WooCommerce sites, depending on dataset size and traffic.
maxmemory 512mb
You can use mb or gb suffixes. Set this value based on how much RAM your server can spare — leave enough headroom for PHP, MySQL, and the OS.
Key Settings to Configure in Redis.conf
Below are the settings you should review and apply in your redis.conf file for a WordPress object cache deployment.
# Set a memory ceiling. Adjust to suit your available RAM and to ensure you are not constantly evicting data. This will depend on the size of your site.
maxmemory 512mb

# Evict least-frequently-used keys when memory is full.
# allkeys-lfu is recommended for WordPress cache workloads.
maxmemory-policy allkeys-lfu

# Comment out all save directives to prevent point-in-time snapshots.
# save 3600 1
# save 300 100
# save 60 10000
save ""

# Ensure append-only logging is off.
appendonly no
Note: If you really don’t know what maxmemory to set, set something high-ish, e.g. if you have 16GB RAM on your server, set it to 2048mb and then review the memory used after a day with:
redis-cli info memory | grep humanAfter editing redis.conf, reload the configuration or restart Redis:
redis-cli CONFIG REWRITE
# or restart the Redis service
sudo systemctl restart redis
# or restart like this with Ubuntu
sudo service redis-server restart
Verify your running configuration with:
redis-cli CONFIG GET maxmemory
redis-cli CONFIG GET maxmemory-policy
redis-cli CONFIG GET appendonly
redis-cli CONFIG GET save
A correctly configured Redis instance for WordPress will report no active save directives, appendonly no, a non-zero maxmemory, and your chosen eviction policy.
Install the Redis Object Cache plugin by Till Krus
This is the best Redis object cache plugin out there. Note that Litespeed does include a Redis object cache system, but WP Rocket does not. It’s up to you if you use the one by Litespeed but the one by Till Kruss has way more miles on the clock and has been used by many more sites.
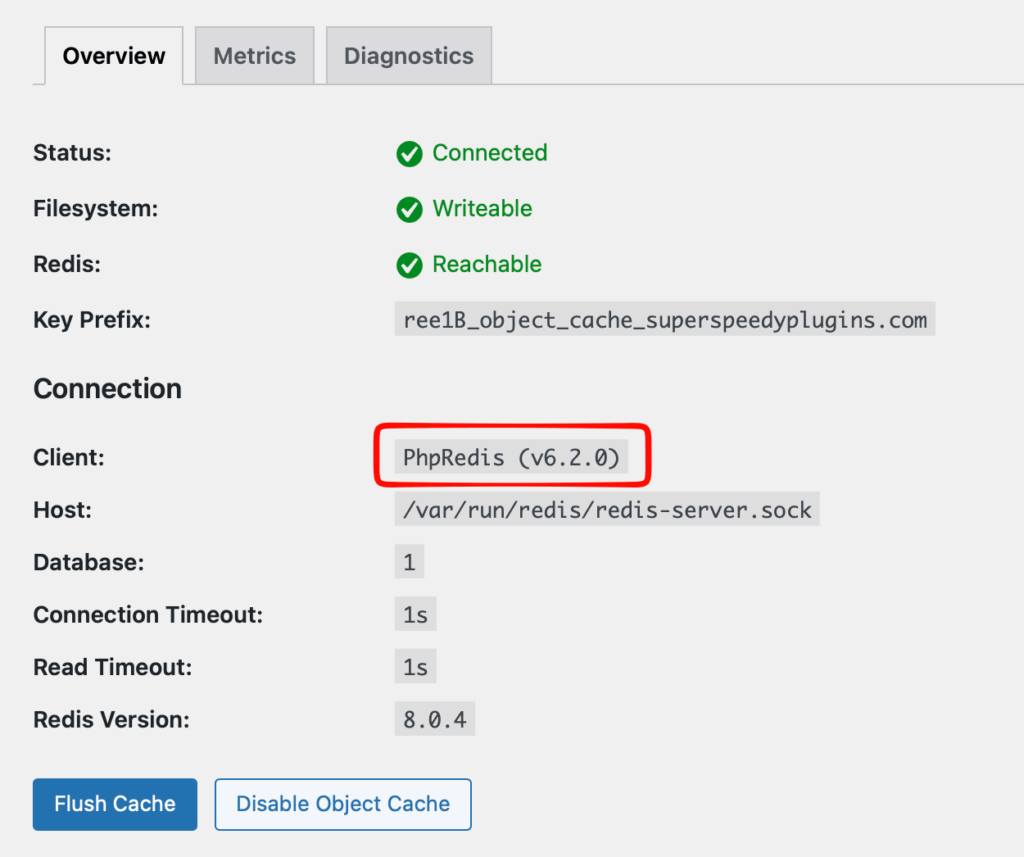
PECL/PhpRedis vs Predis
When you have installed the Redis plugin, the setting page will show you which library is available. You want to be using PECL aka PhpRedis as this is a compiled C library versus Predis which is pure PHP and the C library is obviously far faster. If you only have Predis, ask your hosts for an update.
Configuring wp-config.php for Redis
Many people just use the default config and that’s typically fine, but you can tune it a little bit to avoid putting stuff into Redis that really doesn’t need to be there and doesn’t help performance.
Firstly, you’ll typically see something like this has been added automatically to your wp-config.php by the Till Kruss Redis plugin:
define('WP_REDIS_HOST', '127.0.0.1');
define('WP_REDIS_PORT', 6379);
define('WP_REDIS_DATABASE', 0); // this part of Redis is really stupid, see below
define('WP_REDIS_PREFIX', 'mysite_'); // essential on shared Redis instances
define('WP_REDIS_TIMEOUT', 1);
define('WP_REDIS_READ_TIMEOUT', 1);
Different Redis databased don’t really exist. Whatever eviction policy you set, applies to all. Whatever maxmemory you set, applies to all. There’s literally no real benefit to using separate databases as it really just gives the illusion of separation. Even the FLUSH ALL command flushes all databases. The Redis creators themselves recommend against using separate databases, so it seems like this just arose because it was a logical way for people to ensure data from site A didn’t get mixed up with data from site B.
In practice, you can use the WP_REDIS_PREFIX to differentiate between SiteA_ and SiteB_ if you have e.g. live and staging sites on the same server and there is no harm from there using the same database so long as they have their own unique prefixes. But maybe it makes you nervous, and maybe this DB setting will do something more useful in future so if it bothers you, use different DBs for different sites on the same server AND different prefixes, but really it’s just different prefixes that are required.
In addition, if you ever in future move to a Redis cluster, it can only have DB 0, but then that’s not a big deal to change to using a prefix in future, probably just best to use a different prefix and a different DB for future proofing in case these things change.
Excluding Cache Groups from Redis through wp-config.php
One thing you might want to do in wp-config.php is to exclude the WooCommerce session IDs from being stored in Redis. This used to be a requirement and may become a requirement again in future, but I have not seen Woo Session IDs being stored in Redis for a while:
define( 'WP_REDIS_IGNORED_GROUPS', [
    'wc_session_id',
] );
What if you cannot install Redis?
If you are on a shared host and cannot install Redis then the Docket Cache plugin is a really good alternative object cache.
What to notice with Redis installed
The very first page load after an object cache flush or initial installation may be very slightly slower as the cache fills up with data. But on subsequent page loads across your site you’ll notice fewer SQL queries (e.g. if using Query Monitor) and you’ll notice faster response times. Remember, prior to installing and configuring Redis, you should clean up your options table to ensure you don’t store tons of crap in Redis that ends up being served up on every page load.