WhatsApp Integration Setup Guide
Super Speedy Chat connects to WhatsApp through Meta’s official Cloud API, so visitors can chat with you on WhatsApp and, if you want, every chat message can be forwarded to your own phone for instant replies. Unlike the Discord integration there is no companion bot to run: Meta calls a REST webhook on your site directly. This guide walks through the whole Meta side in order, with the traps flagged where you will actually hit them.
Available since 1.11.0. The webhook activity log and the automatic account-subscription check in Test Connection need 1.11.4 or newer.
For how the two modes behave day to day, read WhatsApp Integration: Chat With Visitors From WhatsApp. For handling the resulting conversations in wp-admin, read Managing Conversations.
How It Works
- Visitor entry channel: a visitor messages your WhatsApp business number, for example by tapping a “Chat on WhatsApp” link in the chat bubble. The message reaches your site by webhook and becomes a normal conversation in the Chats inbox. Your replies from wp-admin are pushed back to the visitor’s WhatsApp, subject to Meta’s 24-hour window (see below).
- Forward to your phone: optionally, every visitor message from any channel is forwarded to your personal WhatsApp, tagged with the conversation number. You answer by quote-replying (swipe) on your phone, and the reply is routed to the right conversation and on to the visitor.
Both modes can run at the same time. Authentication of inbound webhooks is done two ways: a verify token for Meta’s initial handshake, and an app secret used to validate the signature on every message Meta sends.
Unlike the Discord integration, WhatsApp needs no companion bot running on a server. Meta’s Cloud API calls a REST webhook on your site directly, so there is nothing extra to deploy, keep alive, or update.
Before You Start
- A phone number that is NOT registered on WhatsApp or the WhatsApp Business consumer app. A real SIM beats a VoIP number for the verification SMS. The number’s country does not have to match your business’s country – Meta has no such rule.
- A Facebook account and a Meta Business portfolio (business.facebook.com).
- Super Speedy Chat active on your WordPress site, reachable over public HTTPS (Meta must be able to call the webhook).
Meta’s dashboard navigation is unreliable – menu items move and pages redirect – so every step below gives a direct link, with <APP_ID> standing in for your app’s numeric ID. The rule of thumb: almost everything lives under Use cases > Customize once the app exists.
Everything the plugin needs from Meta, in order:
| # | Get or do | Where |
|---|---|---|
| 1 | Create the app with the WhatsApp use case | developers.facebook.com/apps |
| 2 | Add and verify your business phone number, copy the Phone Number ID | Basic setup > Step 2 |
| 3 | Permanent access token | System Users (not the dashboard token button) |
| 4 | App Secret and privacy policy URL | App settings > Basic |
| 5 | Fill in the plugin settings | wp-admin > Super Speedy Chat > Settings |
| 6 | Webhook: callback URL, verify token, subscribe the messages field | Basic setup > Step 2 > Configure Webhooks |
| 7 | Subscribe the app to your WhatsApp Business Account | the plugin’s Test Connection does it |
| 8 | Publish the app | the app’s Publish page |
| 9 | First real test | WhatsApp on your phone |
Step 1: Create the App
Go to https://developers.facebook.com/apps/ and click Create App. Choose the use case “Connect with customers through WhatsApp” – that exact one; it is what puts the WhatsApp menus on your app. App type Business, and attach your business portfolio when asked.
Note the App ID shown on the app card and in the top bar – every direct link below needs it.
Step 2: Add and Verify Your Phone Number
Direct link: https://developers.facebook.com/apps/<APP_ID>/use_cases/customize/, then in the sidebar open Basic setup > Step 2. Production setup.
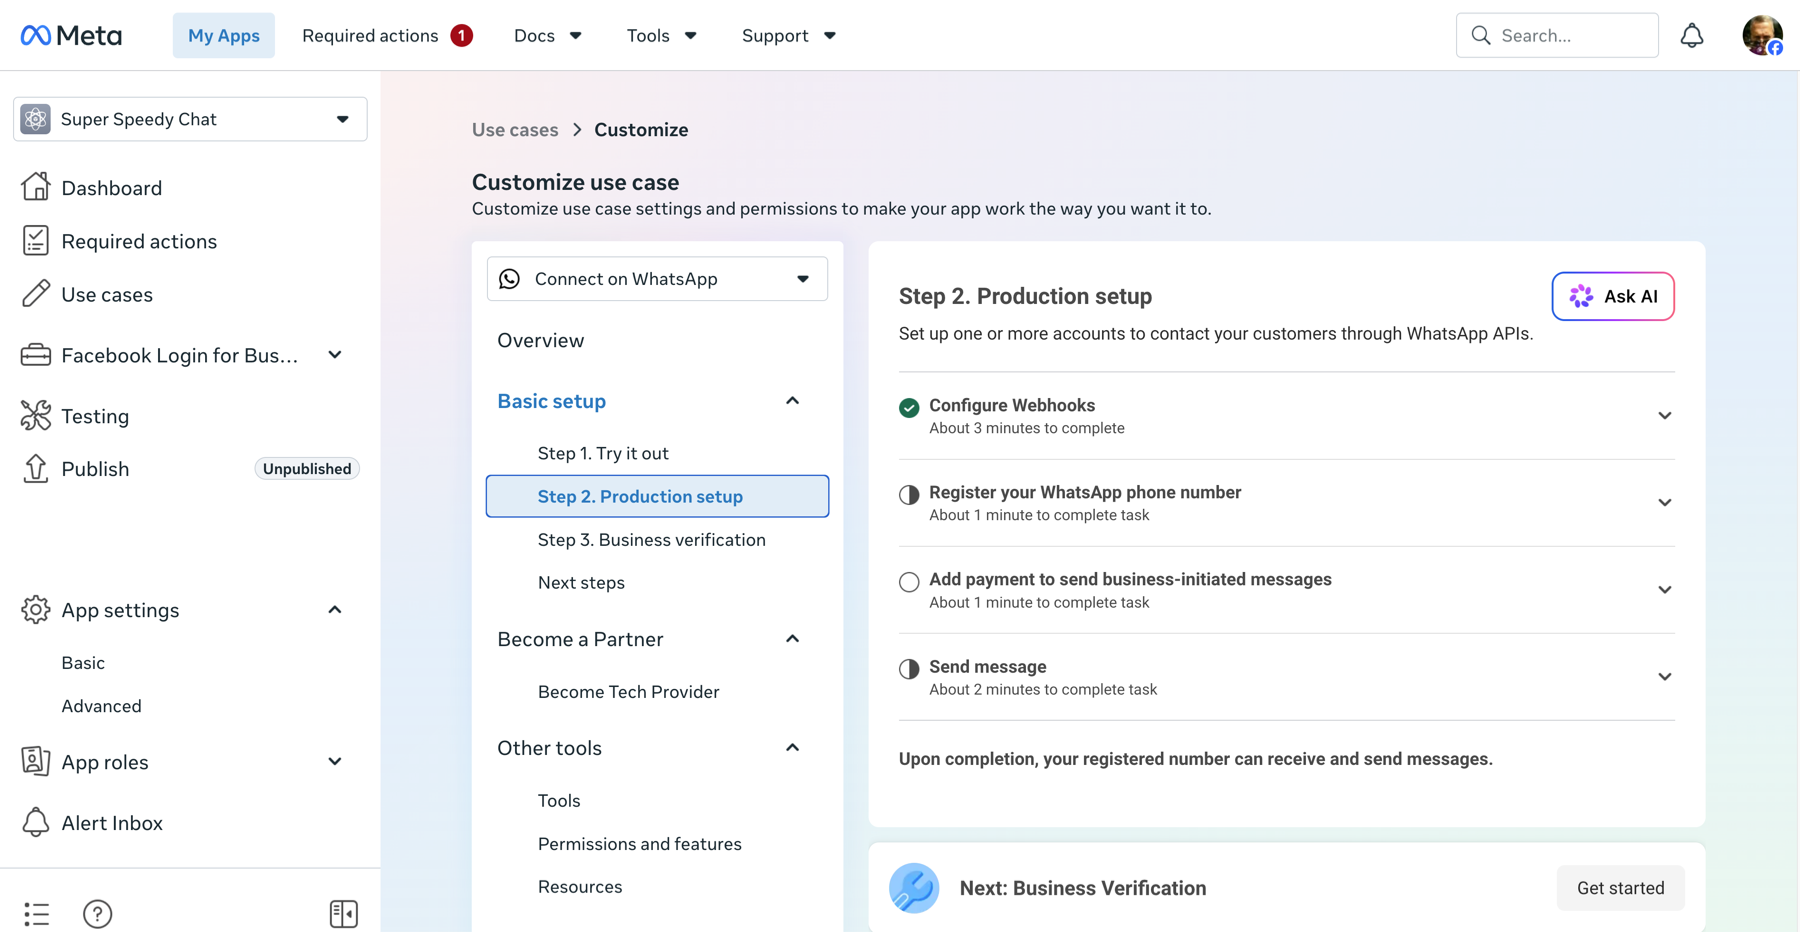
- Add the number under Register your WhatsApp phone number. Pick the dial code manually – the dropdown defaults to your business’s country, but that is a default, not a rule.
- Verify by SMS, or use the voice-call option if the SMS does not arrive within 10 minutes.
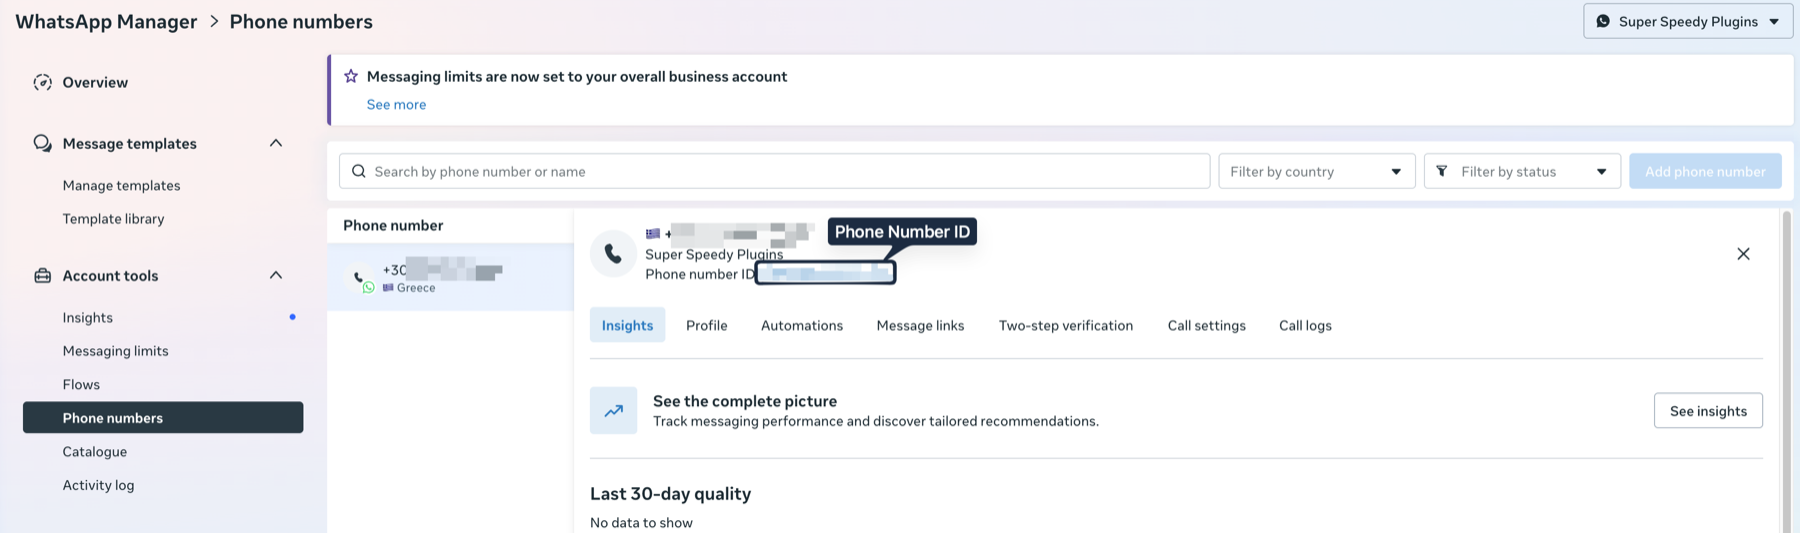
- Copy the Phone Number ID – the long numeric ID shown under the number, not the phone number itself. It also appears in WhatsApp Manager under Account tools > Phone numbers.
Verification-code requests are capped at 10 per 72 hours; hit the cap and Meta blocks the number for 72 hours (error 133016). After two failed SMS attempts, switch to the voice call – do not keep requesting codes.
Ignore Step 3. Business verification entirely. It verifies your legal entity, wants documents and contacts from your business’s registered country, and is not needed to run the API – it only matters for higher messaging limits later. The dashboard nags about it constantly; keep ignoring it.
Step 3: Create a Permanent Access Token (System User)
The dashboard’s own “Generate token” button produces a token that expires after 24 hours, and it can dead-end in an “Email verification is required” loop even when your email is verified. Skip it; the System User route always works.
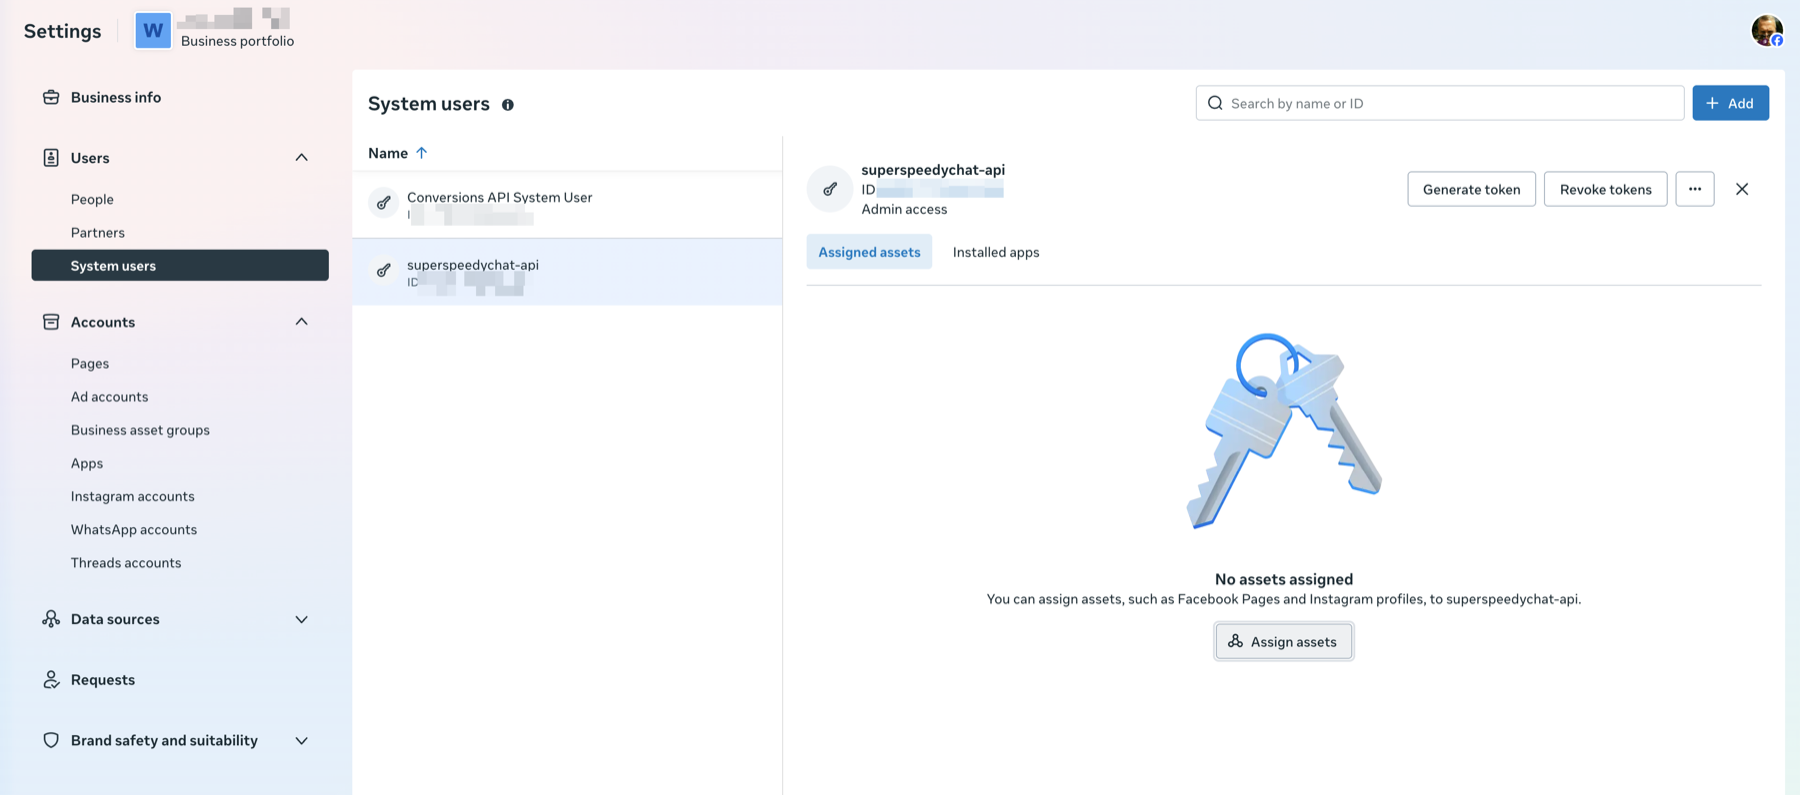
Open https://business.facebook.com/settings/system-users:
- Click Add and create a system user – name it something like
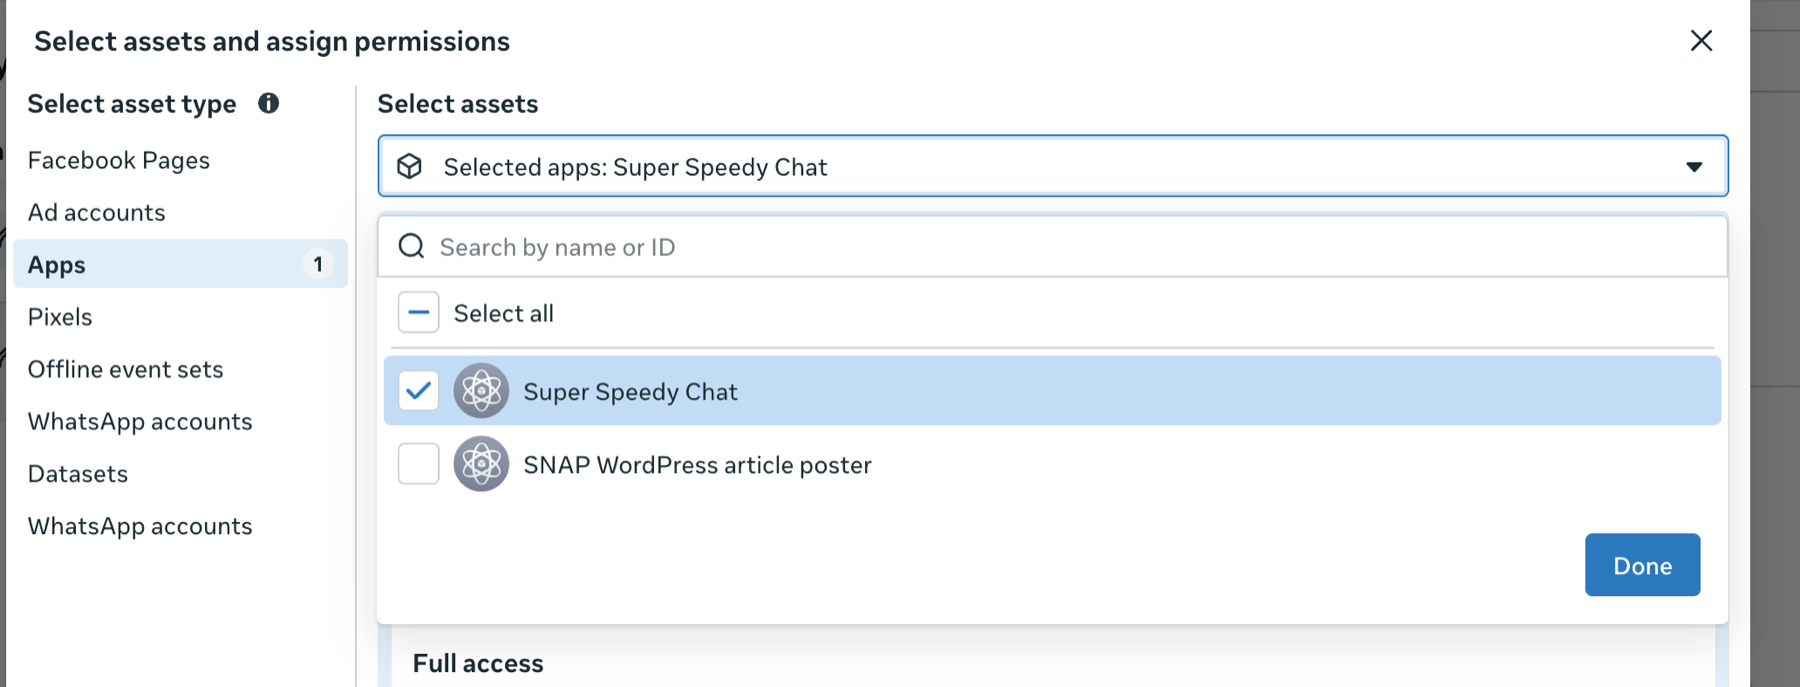
ssc-api, role Admin. - Select it, click Add assets, choose Apps, tick your app, and enable Full control (Manage app).
- Click Generate New Token: pick your app, set expiration to Never, tick the
whatsapp_business_messagingandwhatsapp_business_managementpermissions, and click Generate token. - Copy the token immediately – it is shown once.
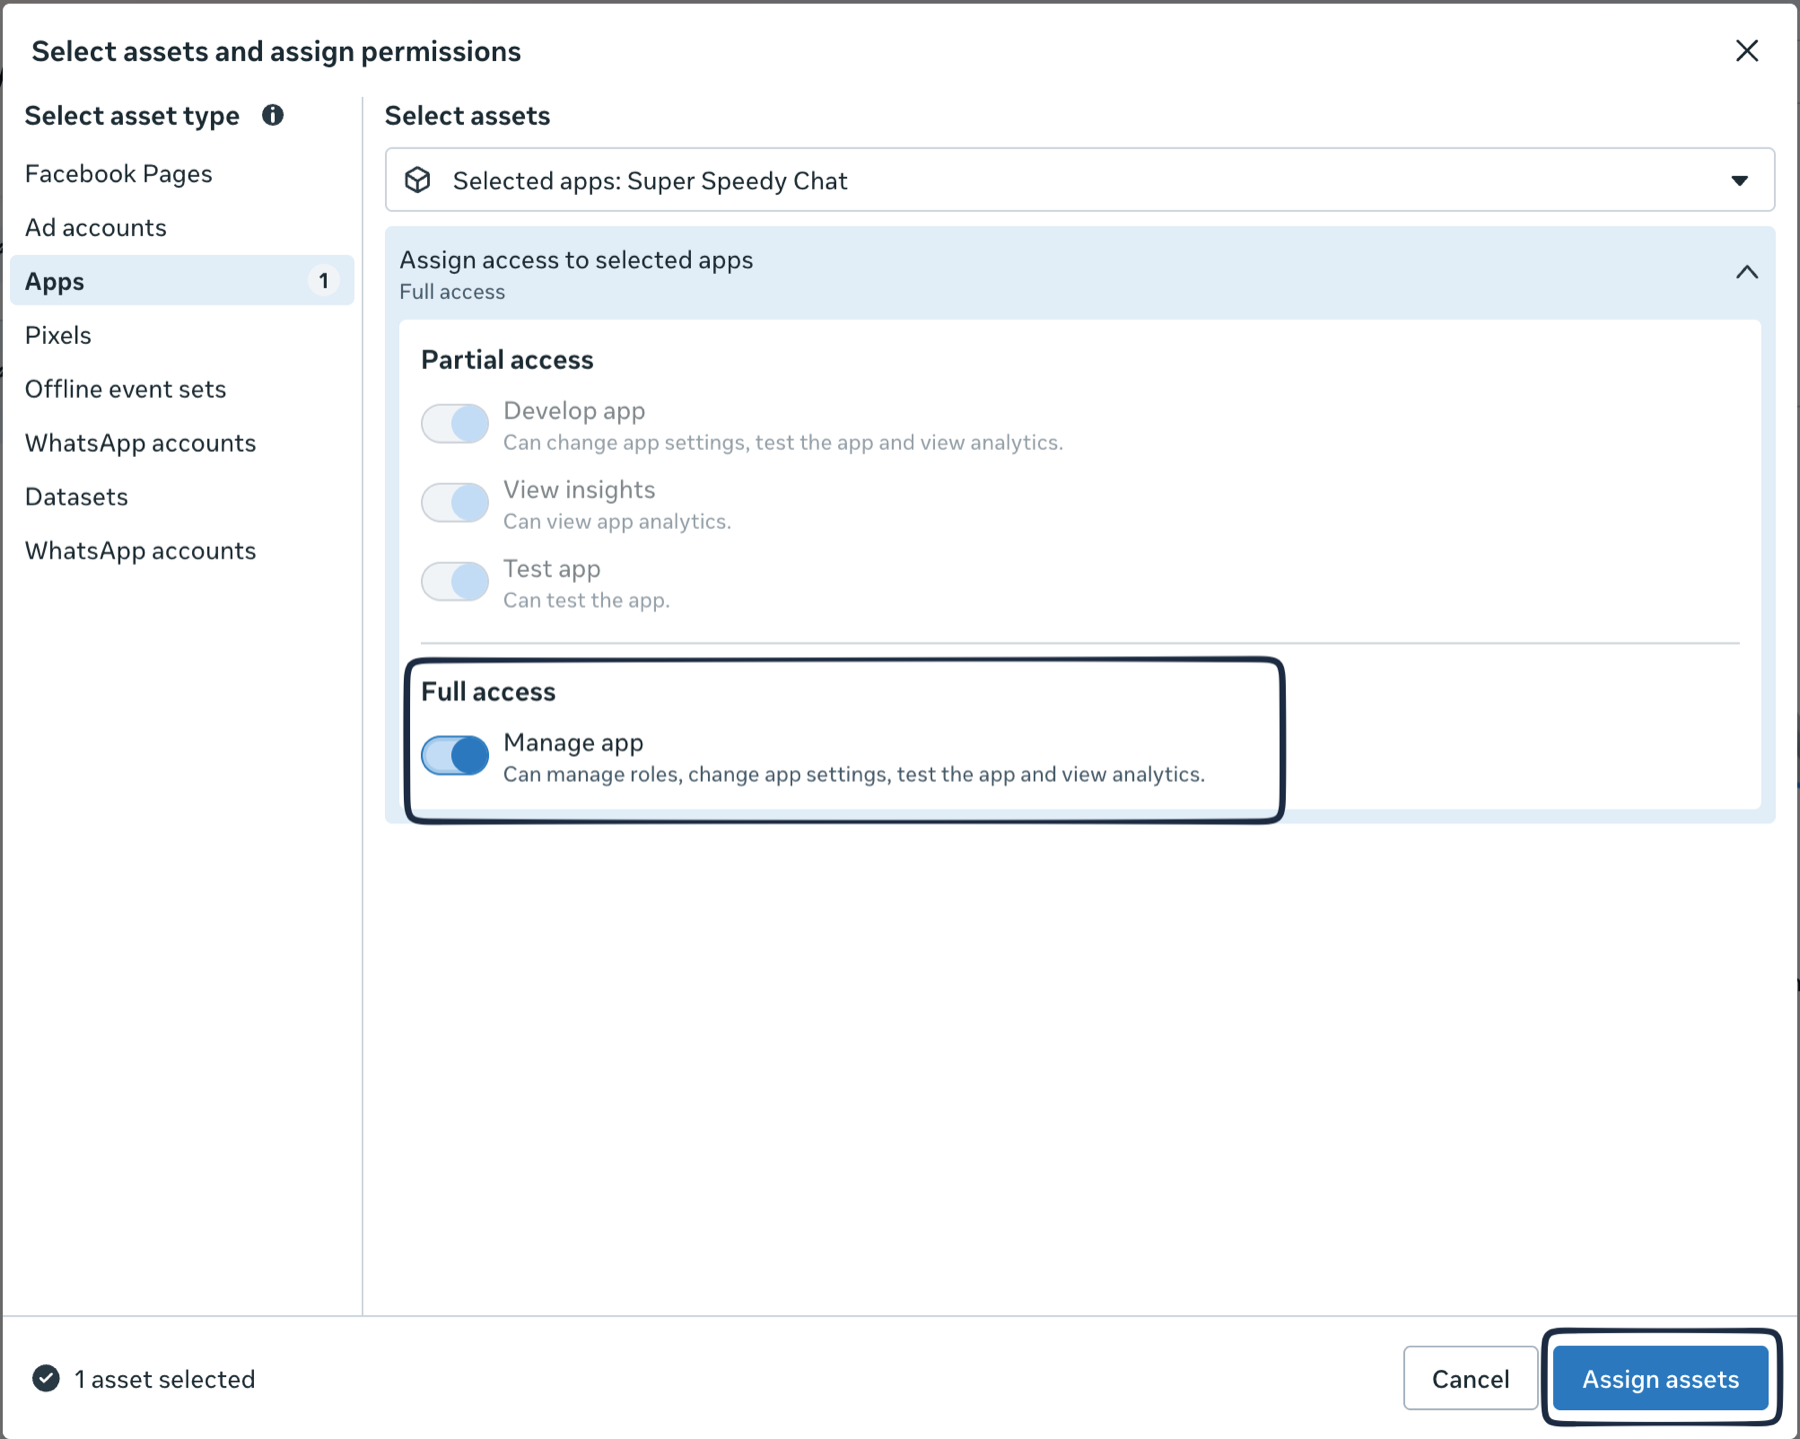
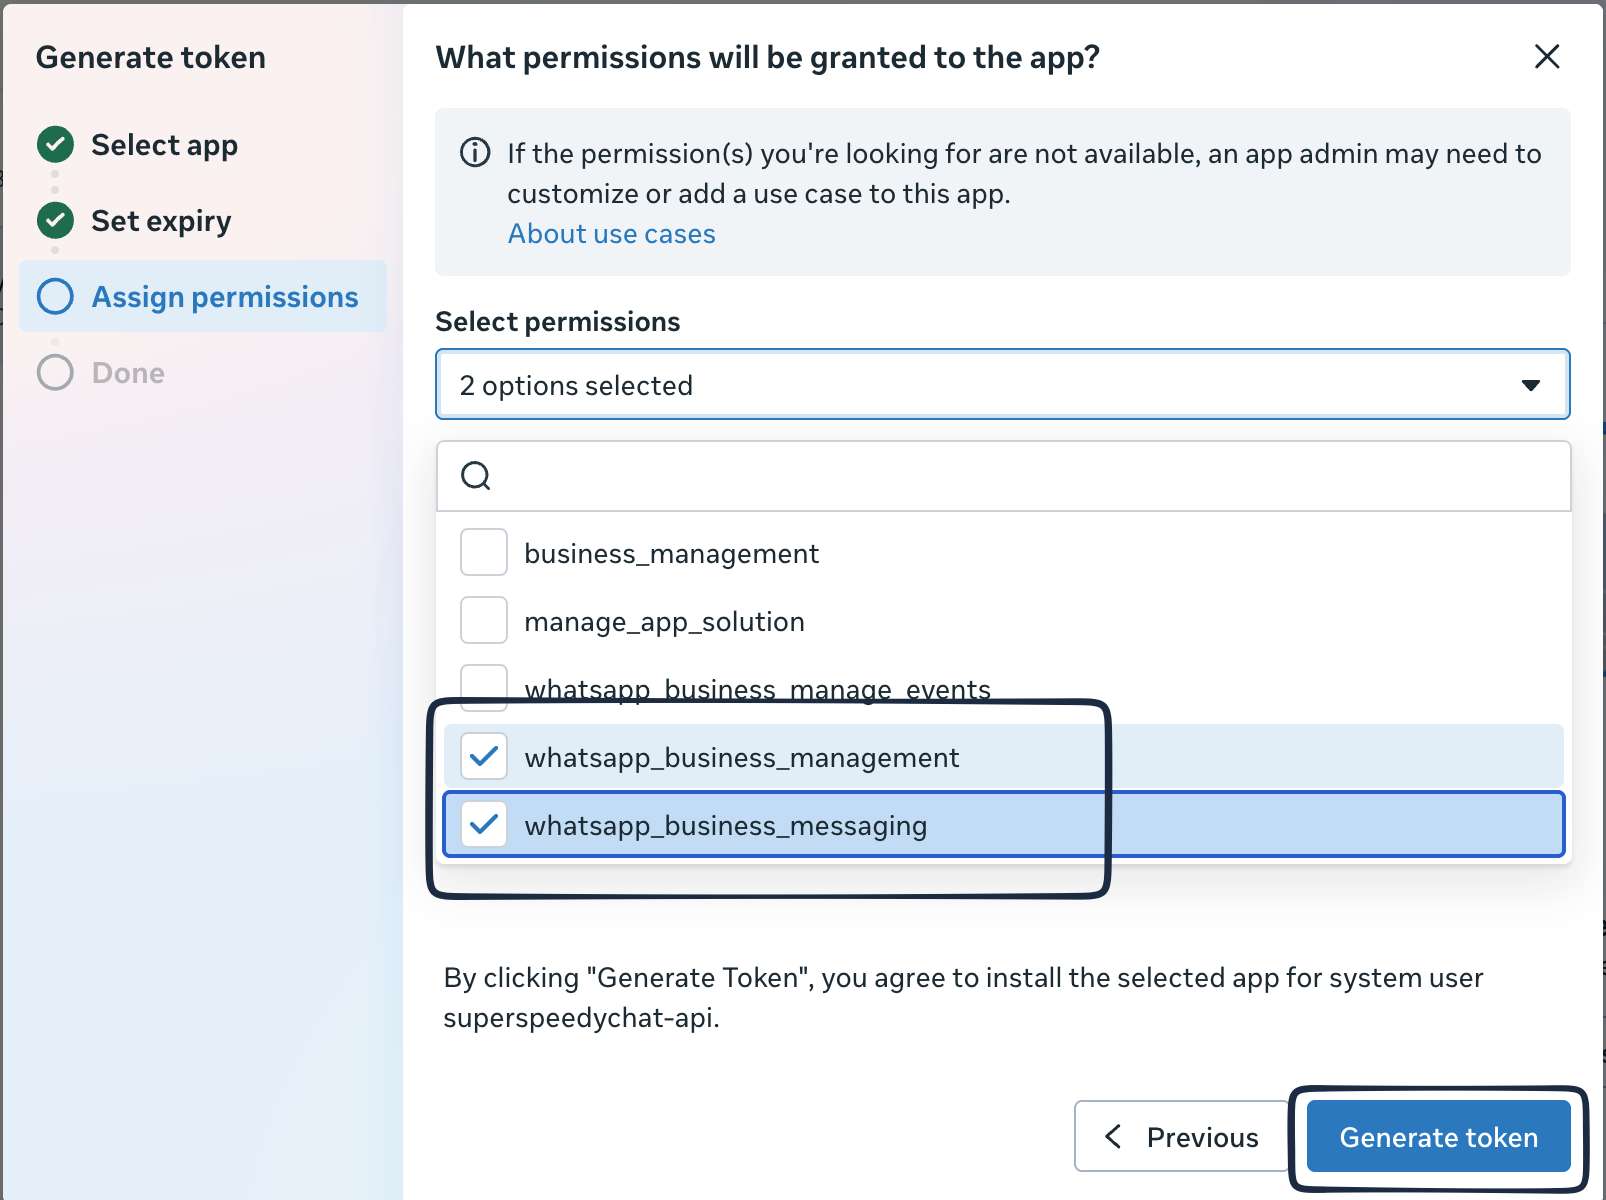
Do not use a token from the dashboard’s own token button for production. It expires after 24 hours and your WhatsApp replies simply stop going out with no obvious cause. Always use a permanent System User token with the whatsapp_business_messaging and whatsapp_business_management permissions.
Keep the access token private. Anyone with it can send messages as your business.
Step 4: Copy the App Secret and Set Your Privacy Policy URL
Direct link: https://developers.facebook.com/apps/<APP_ID>/settings/basic/. Click Show next to App secret and copy it. While you are on this page, also fill in the Privacy policy URL – publishing the app in Step 8 requires it.
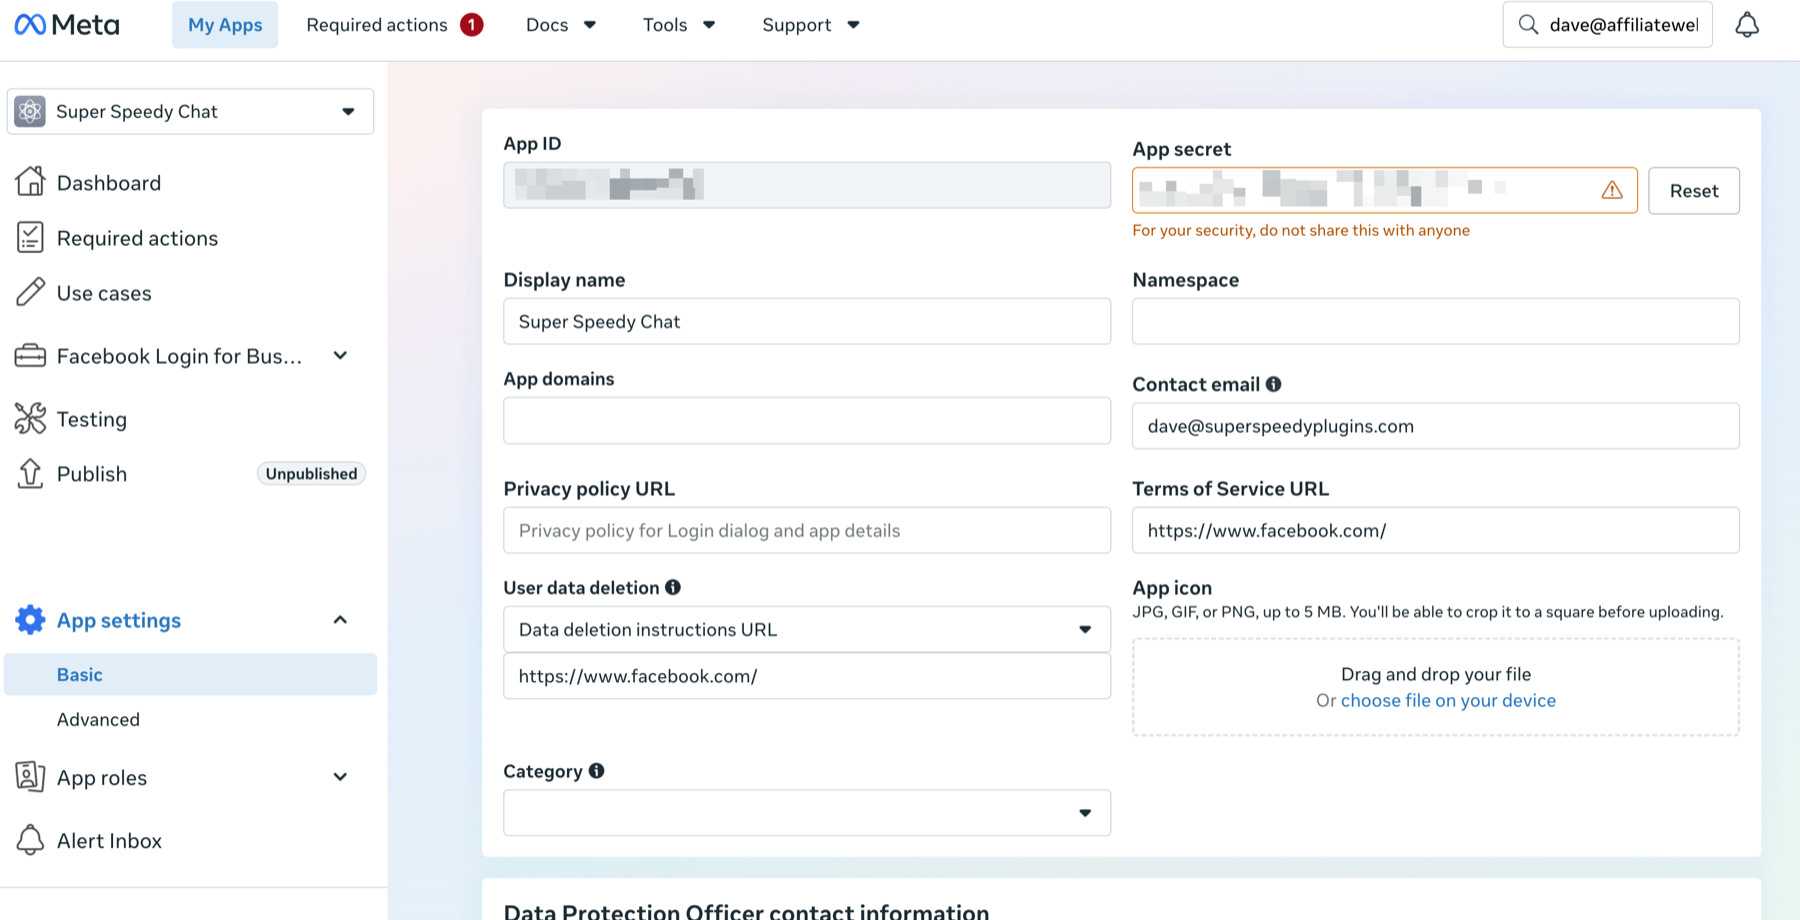
The app secret is as sensitive as the access token – it is what authenticates every webhook Meta sends to your site.
Step 5: Fill In the Plugin Settings
In wp-admin, open Super Speedy Chat > Settings and click the WhatsApp tab. Fill in the fields:
| Field | What to enter |
|---|---|
| Enable WhatsApp | Tick it. |
| Access Token | The permanent System User token from Step 3. |
| Phone Number ID | The numeric ID from Step 2 – not the phone number. |
| App Secret | The app secret from Step 4. |
| Business Phone Number | Your WhatsApp business number in international format, for example +447123456789. Used for the visitor “Chat on WhatsApp” link. |
| Business Account ID (asset_id) | Usually leave empty – the plugin detects it by itself. Only needed if Test Connection asks for it (Step 7). |
| Click to Chat | Tick to show a “Chat on WhatsApp” link in the chat bubble so visitors can switch to WhatsApp. |
| Re-engagement Template | Optional. The name of a pre-approved Meta message template (covered below). |
| Template Language | The language code of that template, for example en or en_US. Defaults to en. |
Click Save Changes, then click Test Connection. It calls Meta’s Cloud API with your token and Phone Number ID and reads back the phone’s details – on success it echoes your verified display number and business name. If it fails, the exact error from Meta is shown next to the button.
The Access Token and App Secret are stored as password fields, so they are not shown back in plain text.
Step 6: Configure the Webhook – Two Parts, and Most People Only Do One
Direct link: https://developers.facebook.com/apps/<APP_ID>/use_cases/customize/, then Basic setup > Step 2 and scroll down to Configure Webhooks. If that page misbehaves, the generic webhooks page at https://developers.facebook.com/apps/<APP_ID>/webhooks/ (object “WhatsApp Business Account”) configures the same thing, and the WhatsApp dashboard has a Webhooks card that lands in the same place.
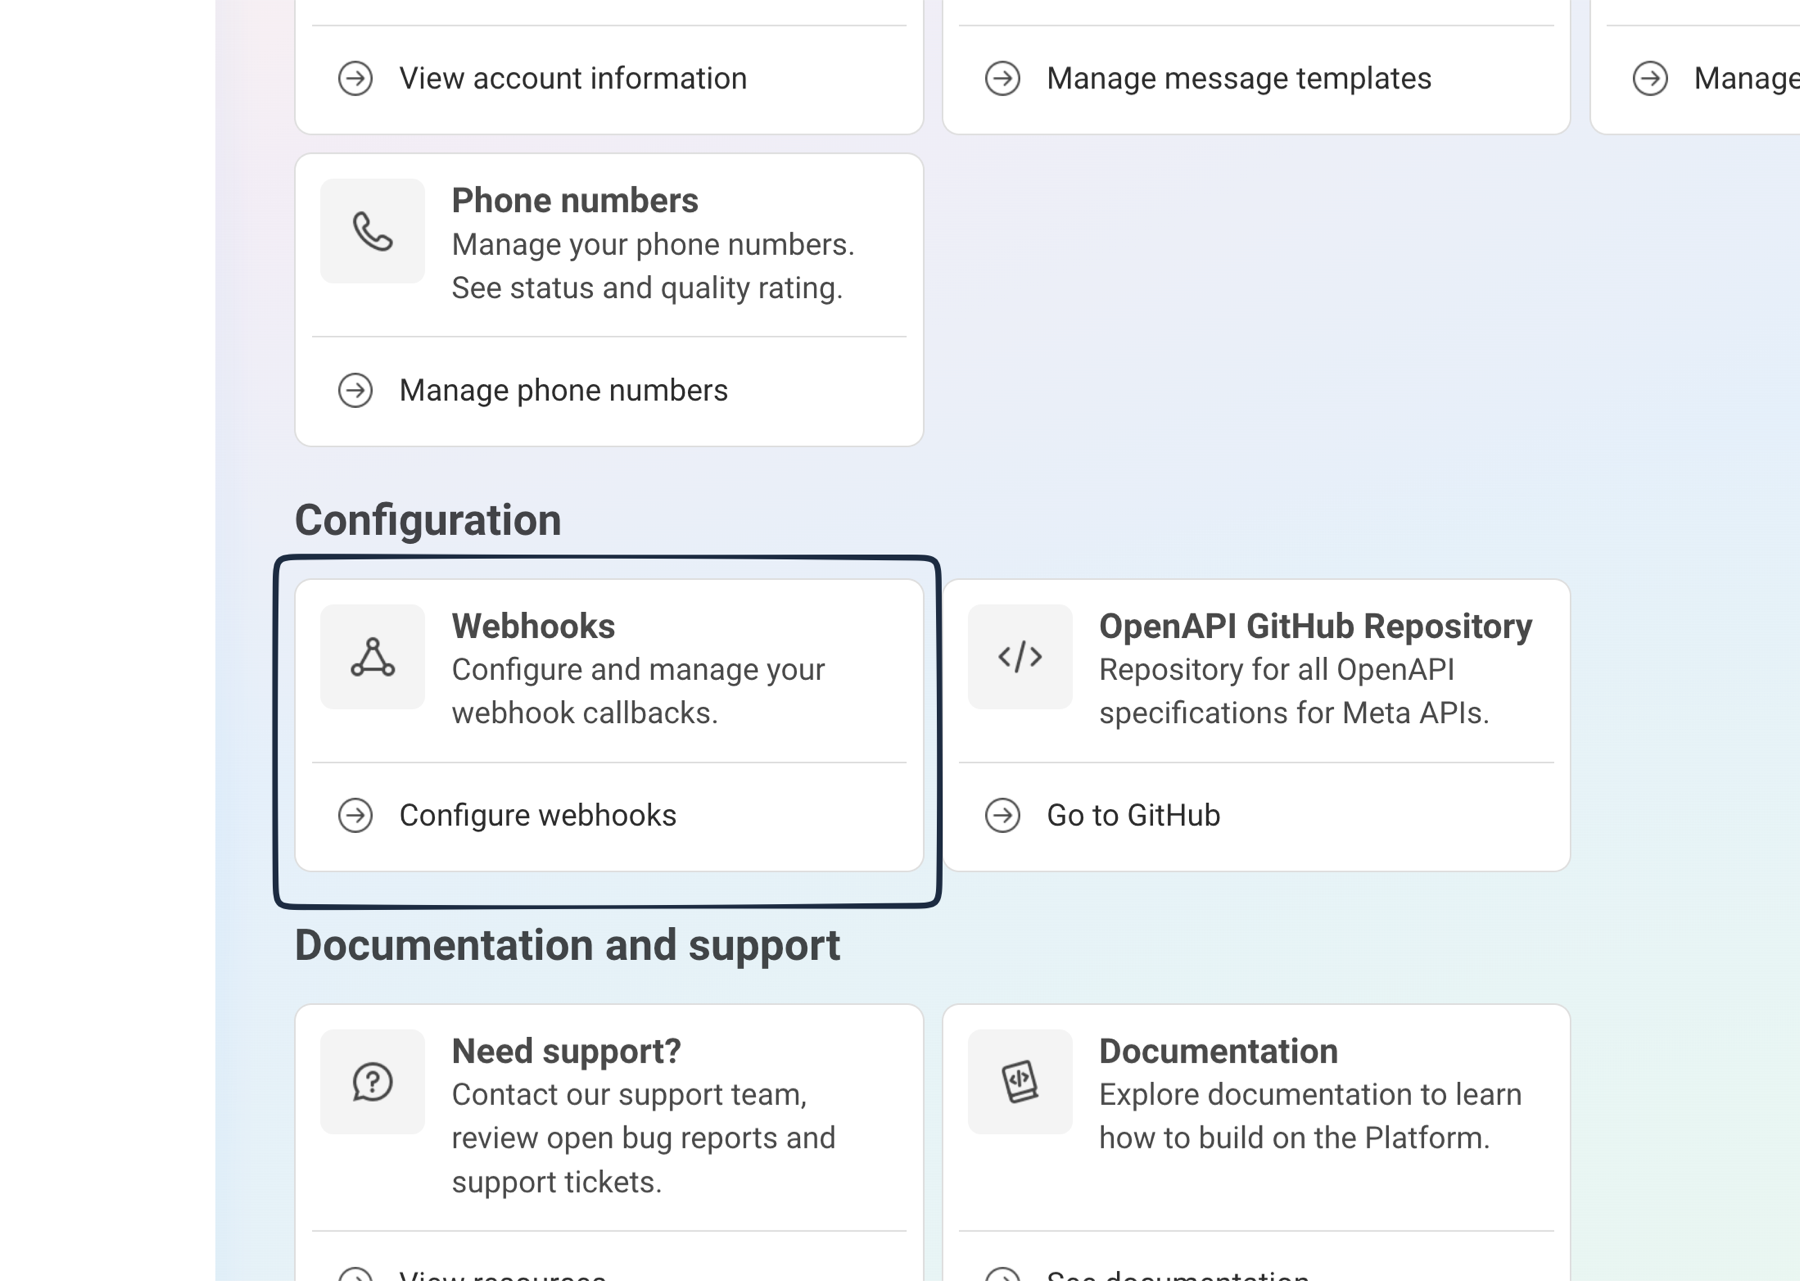
Part 1 – verify the callback. The plugin shows your exact Callback URL and auto-generated Verify Token in the Webhook Configuration box on the WhatsApp tab. Copy both, paste them into Meta’s form, and click Verify and save. Meta sends a one-off GET request to the callback URL with the token; the plugin compares it against its stored token and answers the challenge.
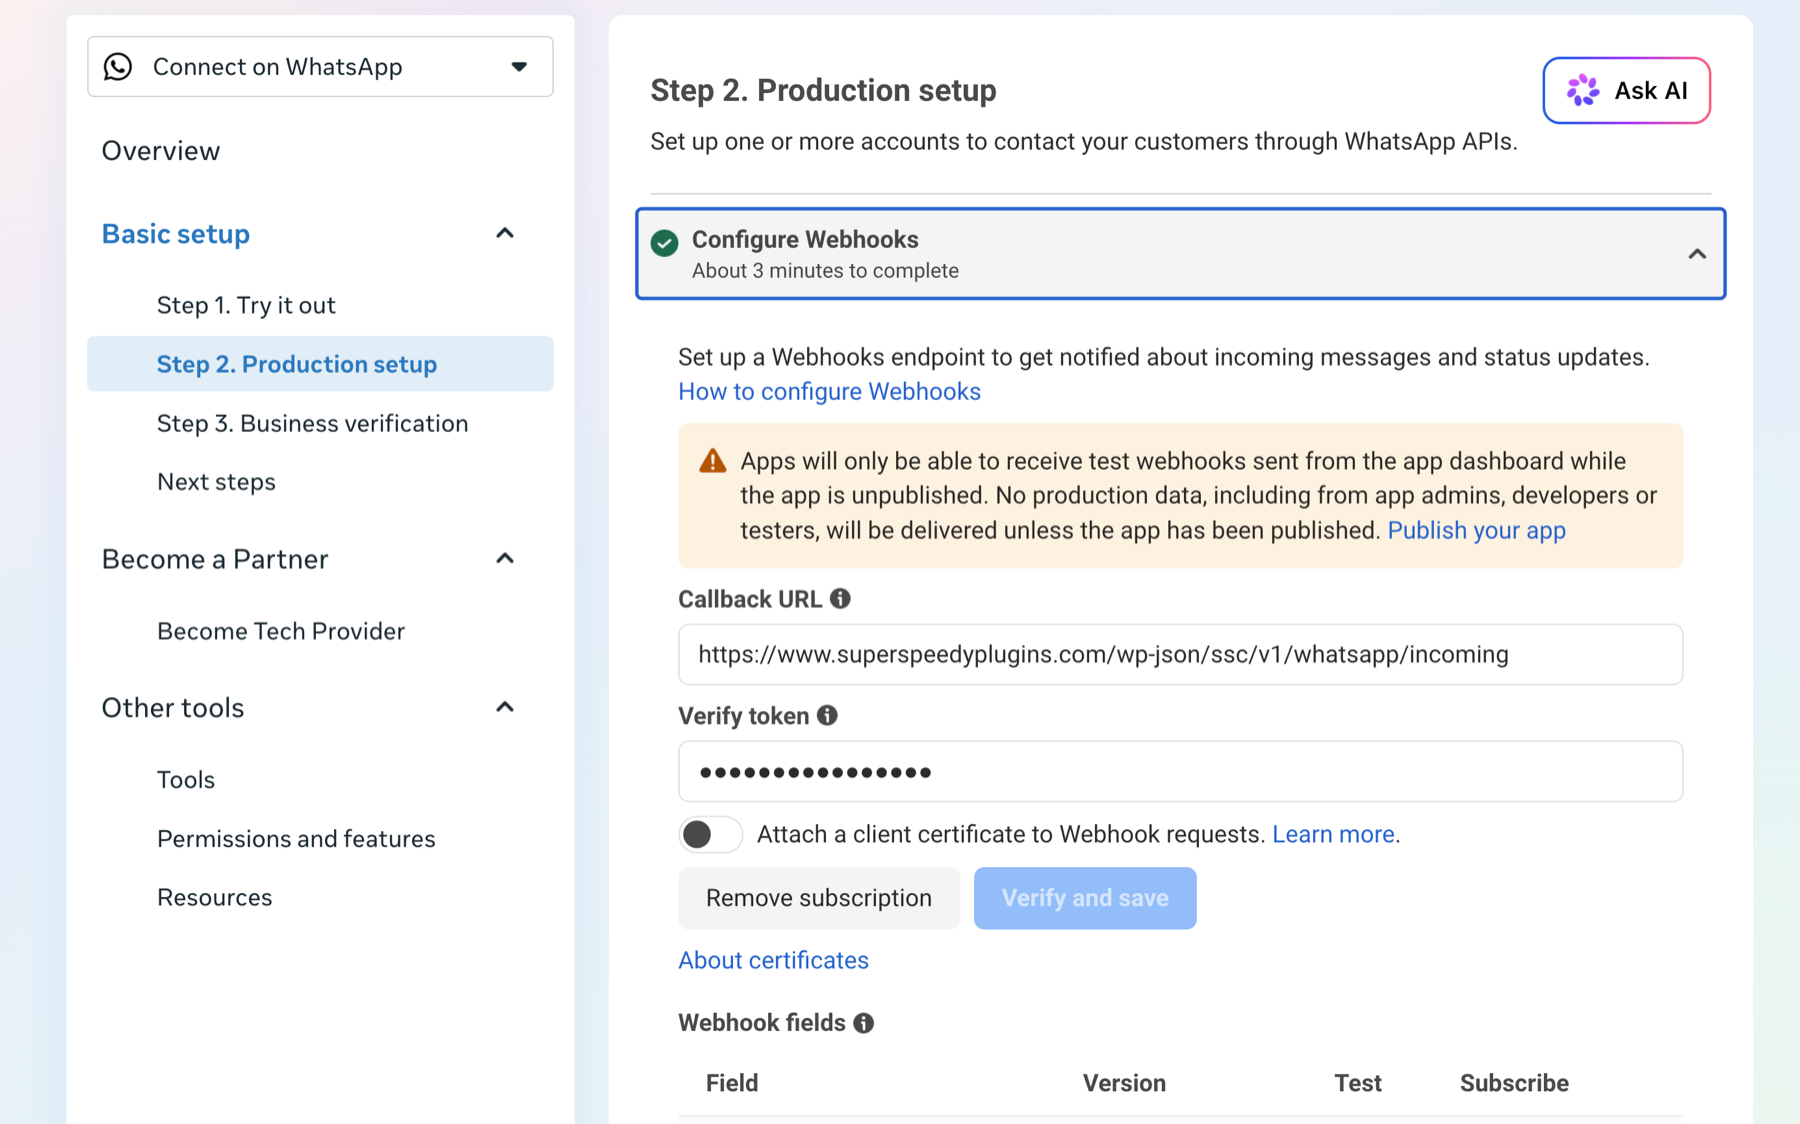
The webhook endpoint is the same for every site, on your own domain:
https://yoursite.com/wp-json/ssc/v1/whatsapp/incomingAfter saving, the verify token field displays as dots – it is still set. Clicking into the field clears the display, not the stored value, but if you type anything in it you must paste the full token again.
Part 2 – subscribe the messages field. In the Webhook fields table below the URL, find the messages row and flip Subscribe on. Saving the callback URL does not subscribe you to anything by itself. Ignore all the other rows and leave the version dropdowns alone.
An unsubscribed messages field is the number one cause of “webhook verified but nothing arrives”. Verifying the callback URL and subscribing to a webhook field are two separate actions – Meta’s UI happily lets you finish the first and skip the second.
Leave the client certificate toggle off. It is optional enterprise mTLS; the plugin authenticates webhooks with the App Secret HMAC signature instead.
Why the verify token and app secret matter
These are the two halves of webhook security, and they do different jobs.
- The verify token is used only during the one-time handshake above. It proves to Meta that whoever entered the callback URL also controls this site, so a stranger cannot point Meta’s webhook at your endpoint.
- The app secret is used on every incoming message. Meta signs each webhook request with an
X-Hub-Signature-256HMAC computed from your app secret. Super Speedy Chat recomputes that signature over the raw request body and rejects the request if it does not match. Without a correct app secret, inbound messages are refused with a 401; it is what stops anyone from forging visitor messages by POSTing to your public webhook URL.
Step 7: Subscribe the App to Your WhatsApp Business Account
This is the biggest trap in the whole setup. Configuring the webhook and subscribing to the messages field is NOT enough: the app itself must also be subscribed to your WhatsApp Business Account, and Meta’s use-case setup flow silently skips that step. The failure signature is unmistakable once you know it: the webhook verifies fine, the dashboard’s per-field “Test” button delivers (it bypasses account routing), but every real message vanishes without trace.
The plugin handles this for you. Click Test Connection on the WhatsApp tab after the webhook step – it checks the subscription and fixes it automatically. It finds the account ID by itself where possible (from your access token, or from the first webhook received). If it reports that the ID could not be determined, grab it once:
- Easiest: open Business settings > Accounts > WhatsApp accounts – the numeric ID is printed under your account’s name.
- Or: open WhatsApp Manager, right-click any sidebar item (for example Phone numbers) and copy the link address – the number after
asset_id=is it. Meta’s docs call this the WABA ID; the URLs call itasset_id– same number.
Paste it into the plugin’s Business Account ID (asset_id) field, save, and run Test Connection again.
Step 8: Publish the App – Yes, Really
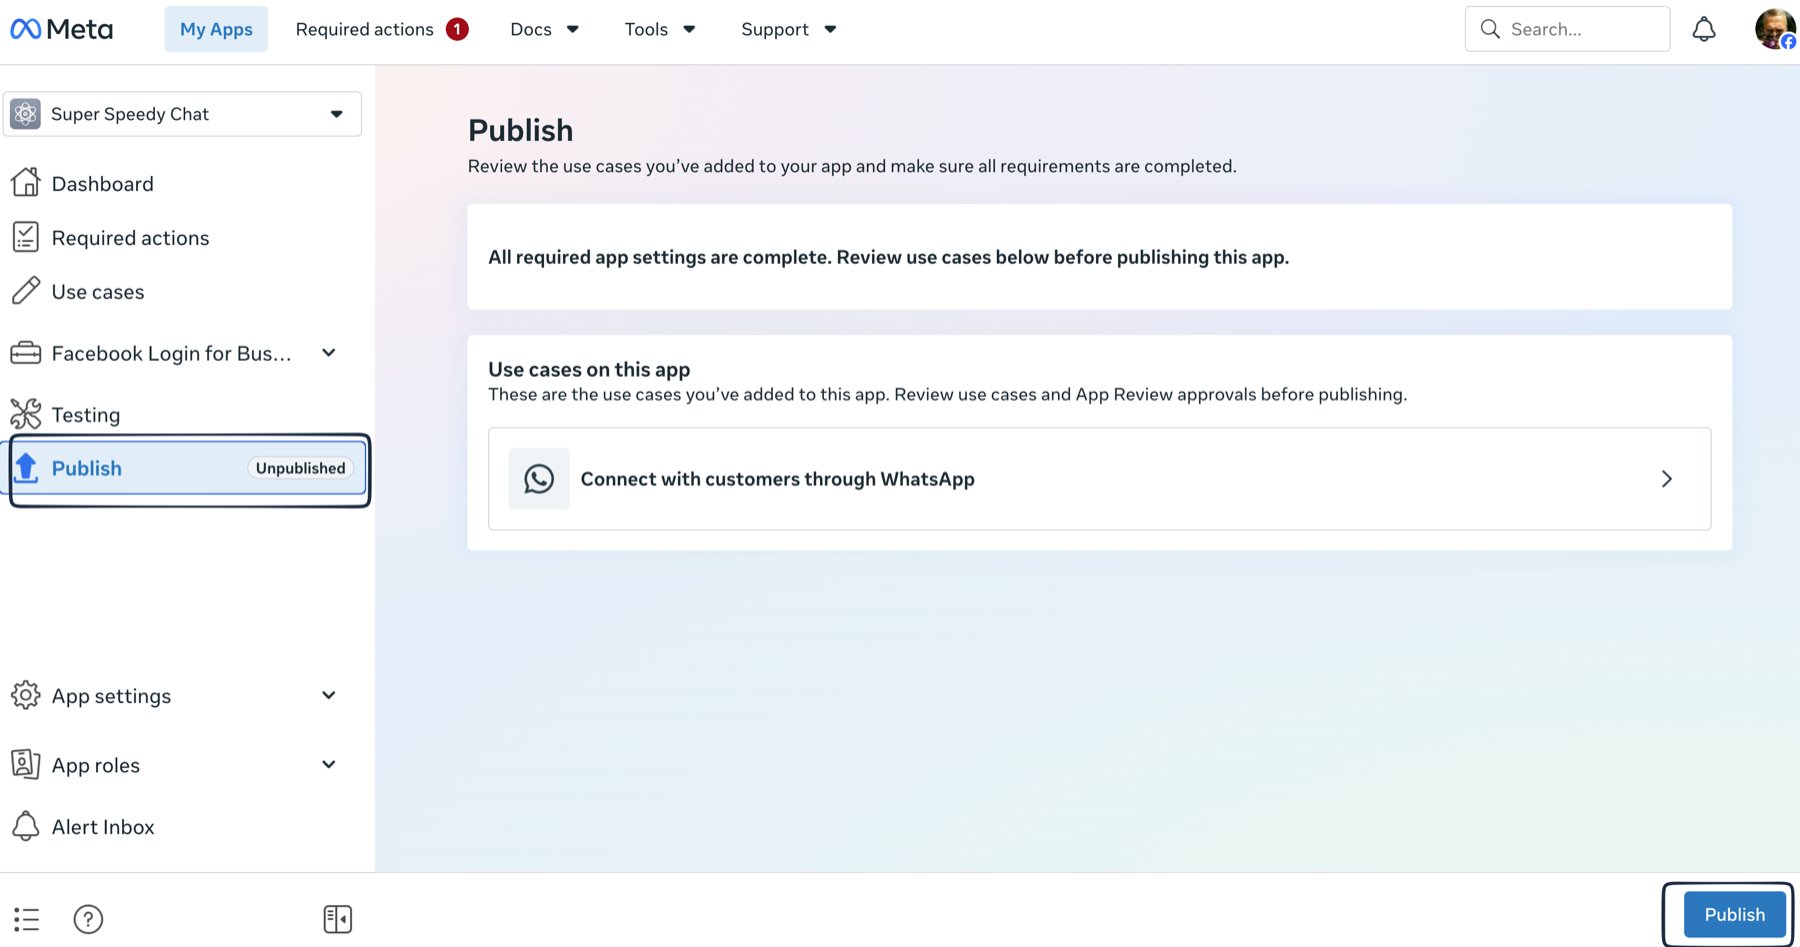
An unpublished app receives NO production webhooks. Meta’s own notice reads: “Apps will only be able to receive test webhooks sent from the app dashboard while the app is unpublished.” So your number verifies, your webhook verifies, and then every real message silently vanishes.
Direct link: https://developers.facebook.com/apps/<APP_ID>/go_live/ (also linked from the warning banner on the webhook page). Publishing means flipping the app from Development to Live, and for messaging with your OWN number it needs no app review – just the privacy policy URL from Step 4. Ignore the “testing requirements” checklist (“0 of 1 API calls” and similar) and the “ready for testing” pills – those belong to the app-review track for tech providers serving other businesses.
The “Missing valid payment method” banner does not block your setup. Customer-initiated conversations – visitors messaging you, and your replies inside each 24-hour window – are free-tier and work without billing. A payment method is only needed for business-INITIATED sends, which for this plugin means only the re-engagement template. Add one at WhatsApp Manager > Account tools > Payment settings once you are live; without it, forwarding to your phone stops whenever your own 24-hour window lapses, with no way to reopen it automatically.
Step 10: First Real Test
- From your phone, open
https://wa.me/<business number without +>and send “hi”. It should appear in the plugin’s Conversations list within seconds – and it opens YOUR 24-hour window for forward-to-phone. - Send a message from the website chat bubble – it arrives on your phone tagged
[#id Name]if forwarding is on. - Quote-reply from the phone – the reply appears in the website bubble.
Testing on a live site? Tick Test Mode on the General settings tab – the chat bubble only appears for visitors whose URL includes ?ssc-test=1 (remembered for their browser session), so you can run this whole test before showing chat to the public.
The 24-Hour Window and the Re-engagement Template
Meta only lets a business send free-form messages to a user within 24 hours of that user’s most recent message. This is Meta’s customer-service window, and it is a platform rule, not a Super Speedy Chat limit.
Inside the window, your replies go out as normal text. Outside it, Meta rejects free-form sends. To cope with this, Super Speedy Chat can send a pre-approved template message instead, to invite the visitor back so a fresh window opens.
- Re-engagement Template is the template name. While testing you can use Meta’s built-in
hello_worldtemplate. For production, create and get a template approved in WhatsApp Manager under Account tools > Message templates, then put its name here. - Template Language is that template’s language code, for example
enoren_US. It must match the approved template exactly or Meta will reject it.
If the window has expired and no template is configured, your reply is still saved in the conversation on your site but is not delivered over WhatsApp until the visitor messages again. The admin conversation view shows a warning when a visitor’s window has expired, and the sidebar shows whether the reply window is currently Open or Expired (24h). Template sends are also where the payment method from Step 9 comes in – they are business-initiated.
Optional: Forward Every Message to Your Phone
If you want to answer from your own phone rather than wp-admin, the WhatsApp tab has two more fields:
- Forward to Your Phone: tick to forward every chat message, from any channel, to your personal WhatsApp.
- Your WhatsApp Number: your personal number in international format.
For “Forward to Your Phone” to keep working, your own 24-hour window with the business number must stay open. Send any message from your personal phone to the business number at least once a day, otherwise Meta closes the window and forwarded messages stop arriving until you message it again.
Once set up, each forwarded message is tagged with the conversation number, and you answer by quote-replying (swipe right on the message) from your phone. Replies are routed back to the correct conversation and on to the visitor wherever they are.
Troubleshooting
The webhook verifies but no messages arrive
The big three causes, in the order to check them:
- The app is not subscribed to your WhatsApp Business Account – run Test Connection on the WhatsApp tab; it checks and fixes this automatically (Step 7).
- The
messageswebhook field is not subscribed in Meta’s webhook fields table (Step 6, part 2). - The app is not published (Step 8).
The webhook activity log at the bottom of the WhatsApp tab tells you which side is dropping messages: every webhook Meta sends is listed with its time and whether it was received, ignored or rejected, with the reason. An empty log means Meta never delivered anything to your site – the problem is one of the three above. Rejected entries mean Meta is delivering but the request fails signature checks – almost always a wrong App Secret.
If the per-field “Test” button in Meta’s webhook table delivers while real messages do not, it is the account-subscription problem (Step 7), guaranteed. Test webhooks bypass account routing, so they prove nothing about real delivery.
Webhook verification fails in Meta
- Confirm the Callback URL you pasted matches the one in the Webhook Configuration box exactly, including
httpsand the/wp-json/ssc/v1/whatsapp/incomingpath. - Confirm the Verify Token matches the one shown on the settings tab. If you clicked into Meta’s token field and typed, paste the full token again – the dots display clears on focus but the stored value only changes if you type.
- The site must be publicly reachable over HTTPS. If it is behind basic auth, a firewall, or an IP allowlist, Meta cannot reach the endpoint.
- If your caching plugin or CDN is aggressive, make sure
/wp-json/ssc/is excluded from caching, as covered in Caching and CDN Compatibility.
Test Connection fails
- Check the Access Token is a permanent System User token (Step 3), not a 24-hour dashboard token that has expired.
- Check the Phone Number ID is the numeric ID, not the phone number.
- Read the error message shown next to the button and the “Last send error” line for the exact reason from Meta.
Meta quirks worth knowing
- “Email verification is required” when generating a token, even though your email is verified: use the System User route (Step 3) instead of the dashboard token button.
- The country dropdown “insists” on your business’s country when adding a number: it is a default, not a rule – change it.
- Token and secret fields showing dots that appear to wipe when clicked: display behaviour only; re-paste the full value if you typed in them.
- The verification SMS never arrives (VoIP numbers especially): wait 10 minutes, then use the voice call option – and mind the 10-per-72-hour attempt cap.
- App settings > Advanced > “Authorize Callback URL” is OAuth login plumbing – nothing to do with WhatsApp webhooks. Leave it empty.
Replies are not delivered to the visitor
- Check whether the 24-hour window has expired for that conversation; the sidebar in the conversation view shows this.
- Configure a Re-engagement Template and Template Language so an expired window can be reopened – and note template sends need a payment method (Step 9).
Forwarded messages stop reaching your phone
- Your own 24-hour window with the business number has probably closed. Send any message from your phone to the business number to reopen it, at least once a day.
For related topics see Spam and Abuse Prevention and Troubleshooting and FAQ.

Comments